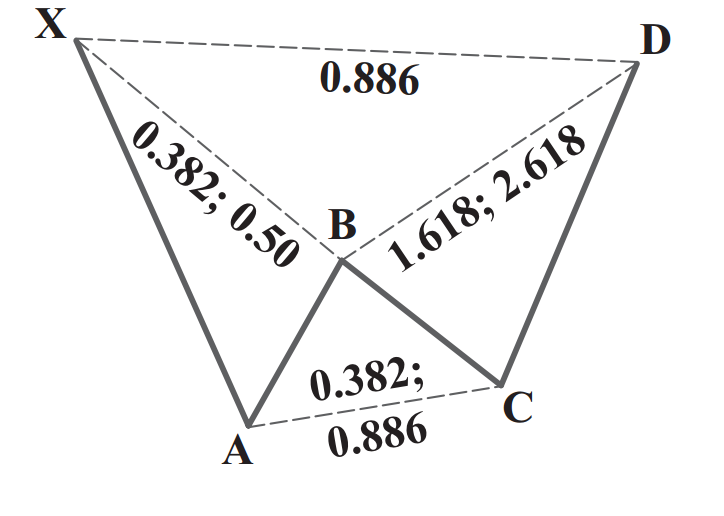
Welcome to the first Harmonic Pattern article of Whirlpool. The Bat pattern requires some very specific rules that be followed strictly to be considered valid. RULES: B point at a less than a 0.618 retracement of XA, preferably a distinct 50% or 38.2% retracement. •D point need to be in the rage of BC projection. And BC projection must be at least 1.618 and maximum 2.618. • AB=CD pattern is usually extended. (CD= 1.27 AB or CD=1.618AB or AB=CD, depends on which gives the most compact PRZ) • 0.886 XA retracement. • C point with range between 0.382 and 0.886 of AB 3 elements define the PRZ:
0.886 XA retracement.
BC Projection- we will choose the projection give the most compact PRZ
AB=CD and its alternatives
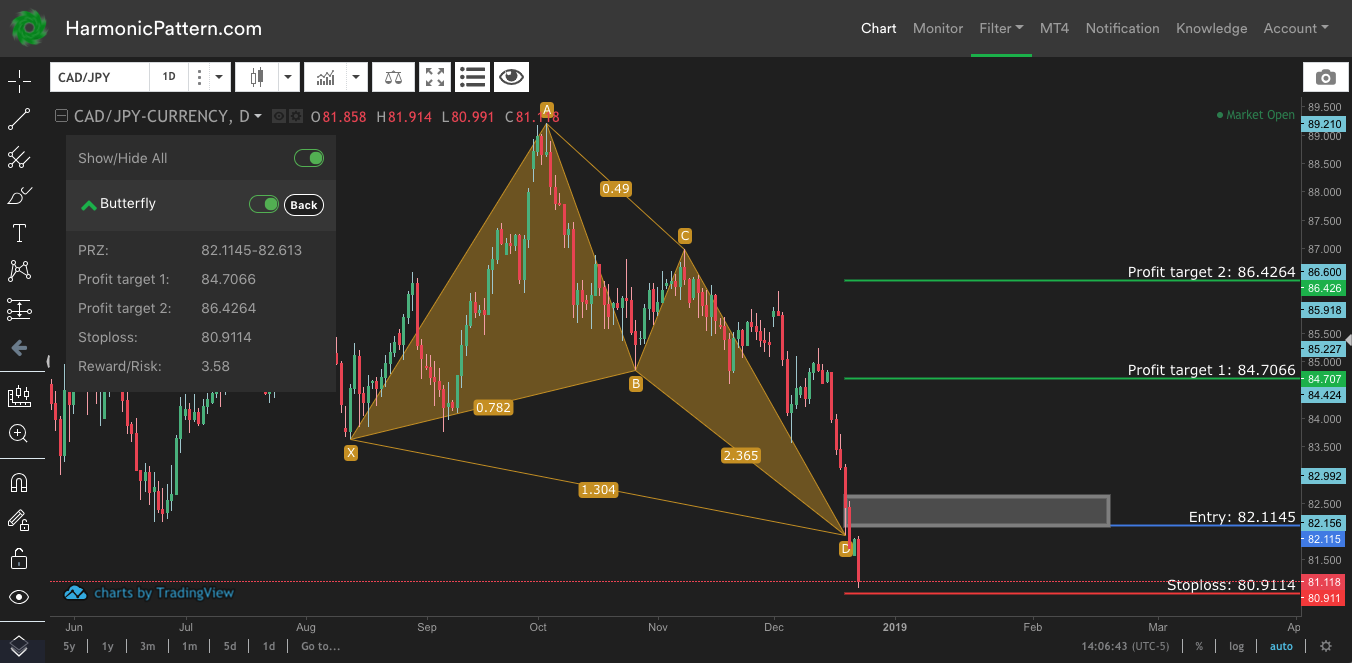
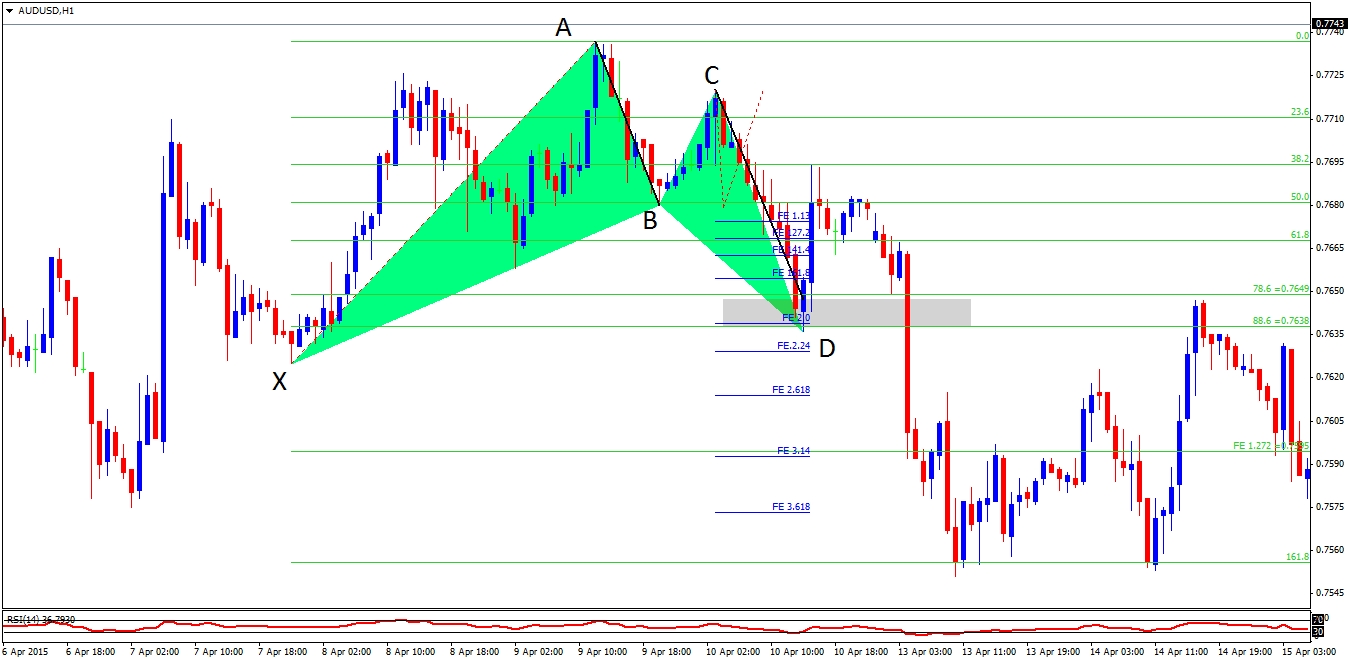
1. Bullish Bat pattern
It is CRITICAL that Every points must satisfy all the rules and the ratio alignments in the image above. There is almost NO Exception for that. These ratios have been tested with thousands of pattern and proven to be very profitable trading them. Following the rule strictly will keep traders from bad setups and false harmonic patterns. Examples: Figure 1 CD = 1.618 AB. In the first example, the Bat pattern is one of the most beautiful Bat I've ever seen in my entire trading career. Point B comes right into 50% retracement of XA - point C is obviously in range so we don't need to check. 0.886 XA retracement, CD=1.618 AB and BC projection 2.0 define a very compact zone (brown rectangle). The price comes in, stabilizes and reverse beautifully. The stop loss level for the pattern should be right below point X. Execution and Profit target are super important in harmonic trading and we will have a whole chapter to cover these skills. For now, we need to train our eyes to spot the pattern and pinpoint our opportunity to make profit with the harmonic pattern Figure 2 CD= 1.27 AB The second example is a very well-formed Bat. Point B comes right into 50% retracement of XA .0.886 XA retracement, CD=1.27AB and 2.0 BC projection clearly define a compact PRZ ( gray rectangle). The Price comes in and get immediately rejected from the zone. However as we can see, the PRZ only provides a temporary support for the pattern - not a home-run reversal as in the first example. Most of the times, harmonic patterns only provide a temporary support/ resistance. That's why where to take profit and how to execute the trade is very important.
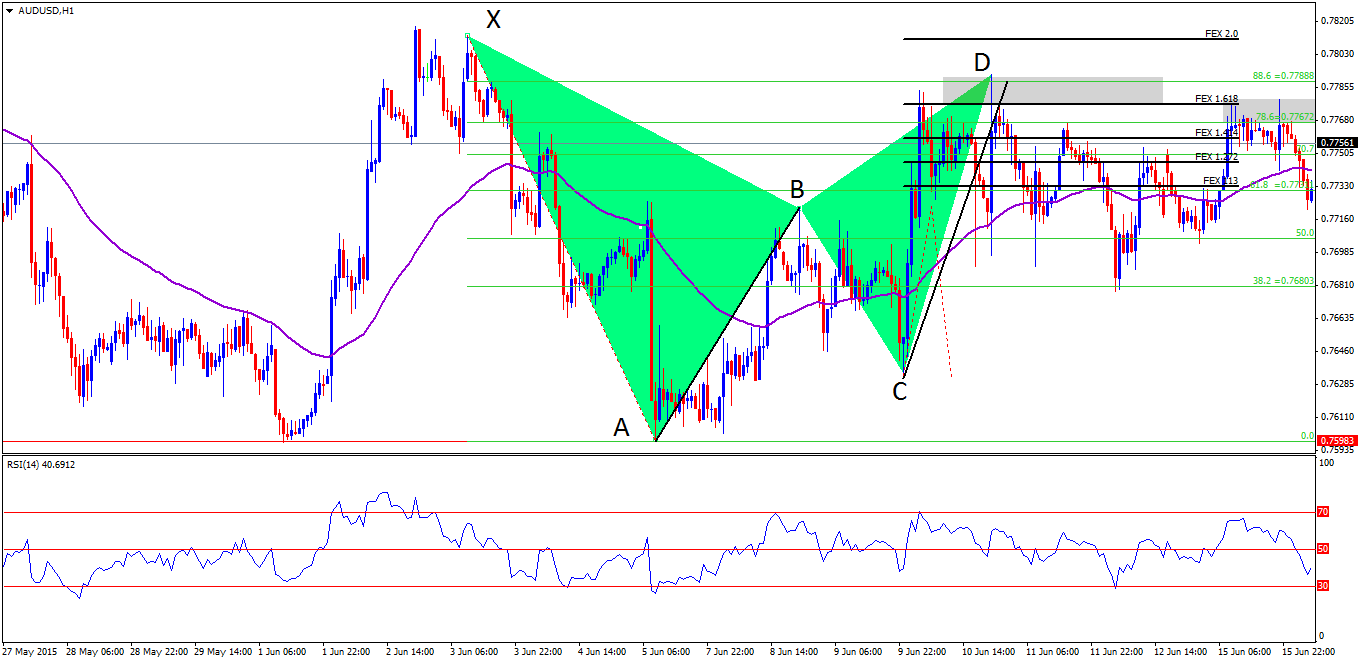
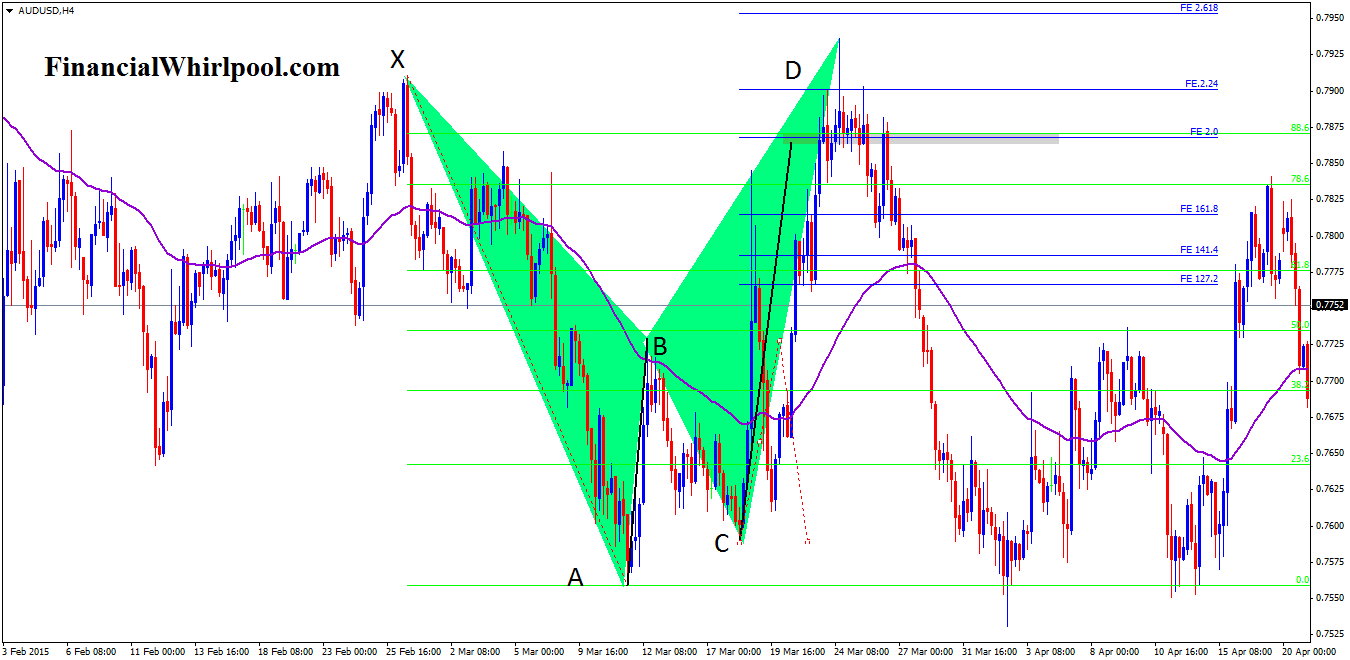
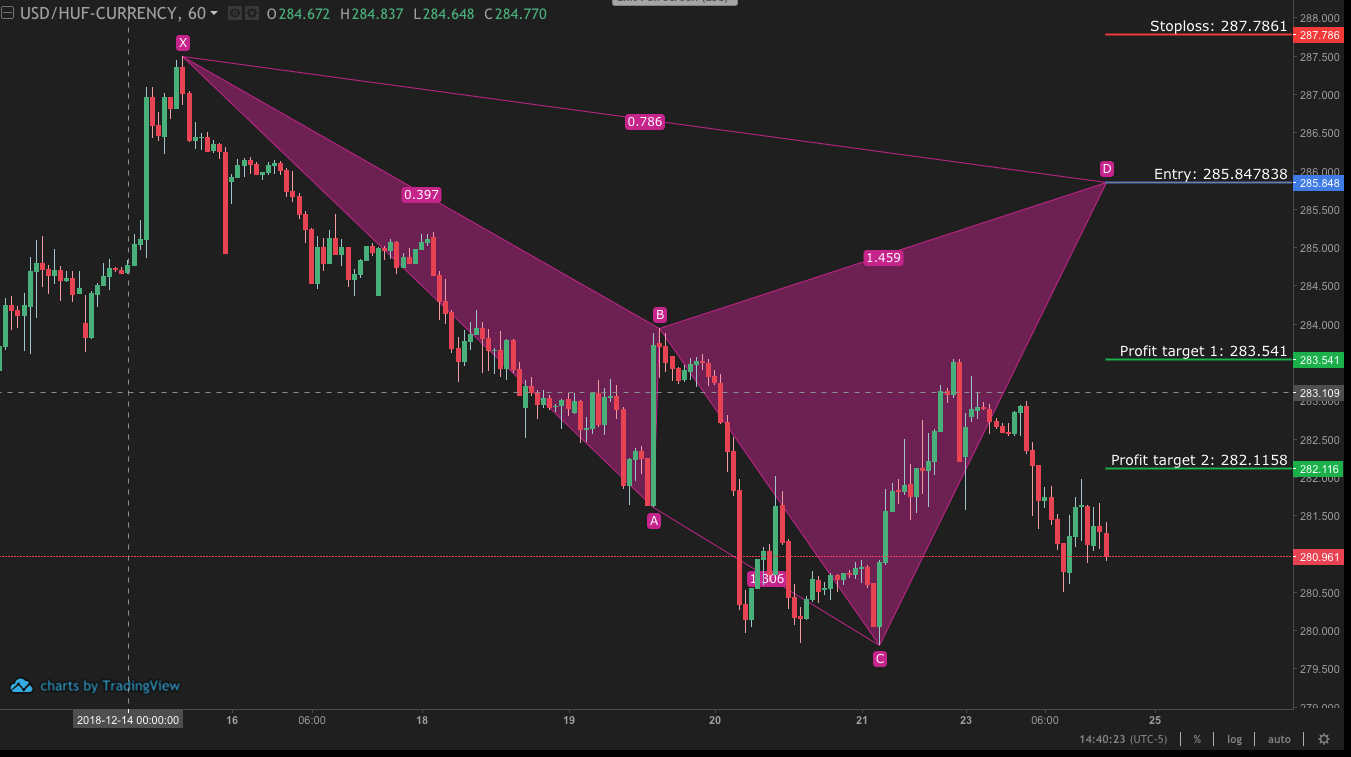
2. Bearish Bat pattern
It is CRITICAL that Every points must satisfy all the rules and the ratio alignments in the image above. There is almost NO Exception for that. These ratios have been tested with thousands of pattern and proven to be very profitable trading them. Following the rule strictly will keep traders from bad setups and false harmonic patterns. Examples: Figure 3 CD=1.27AB In the first example B Point exceeds 50% retracement however it's still quite far from 61.8% retracement and doesn't close above the 50% level, so B point is still valid for a Bat pattern. 0.886XA,CD=1.27AB and 1.618 BC Projection pinpoint the PRZ nicely. The price comes in and get immediately rejected from the zone, marking point D and the Bat completes. Figure 4 CD=1.618AB In the second example B Point exceeds 50% retracement and almost reaches 61.8% retracement. B point in this situation leaves us with a very difficult choice between trading the Gartley (discussed in next chapter) and the Bat. In this situation, we would favor the one with the most compact PRZ, which is the Bat pattern. 0.886XA,CD=1.618AB and 2.0 BC Projection pinpoint the PRZ nicely. The price comes in, test the PRZ with significant bull strength. As you might notice, the price even break X high, which took out my stop loss. However, the price comes back into the PRZ and marks a reversal in trend. This is an example of Harmonic pattern in strong trending market. Sometimes, price will just cut through the PRZ, sometimes test the PRZ with high volatility as in this example. We, traders, have to be prepared for all the scenarios that the market might give us. *Note: in this second example, magically both Gartley and Bat work. The price comes up just to be rejected at 0.786 Retracement, which compltes the Gartley pattern. We will discuss this pattern in the next chapter. Stay tuned! Harmonic patterns require significant practice to recognize in real-time market. It might be difficult at first. But when you've trained your eyes to spot these patterns, the skills will stay with you forever.
 It is CRITICAL that Every points must satisfy all the rules and the ratio alignments in the image above. There is almost NO Exception for that. These ratios have been tested with thousands of pattern and proven to be very profitable trading them. Following the rule strictly will keep traders from bad setups and false harmonic patterns. Examples:
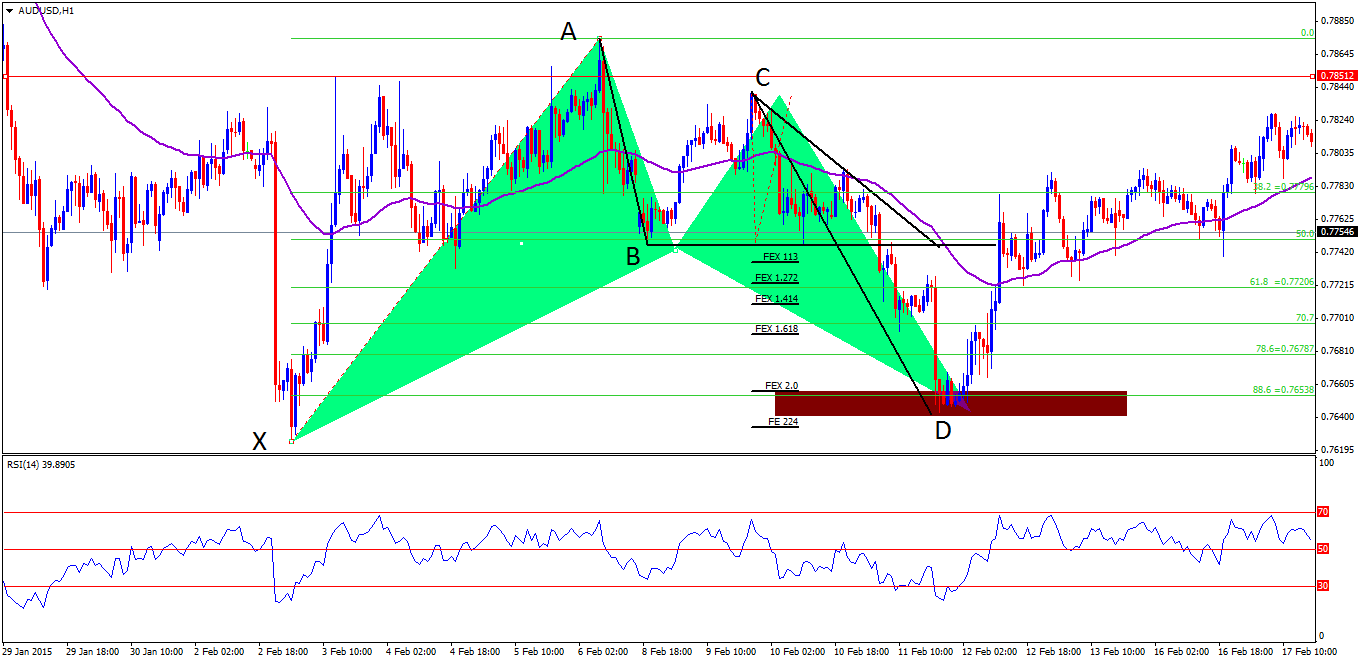
 It is CRITICAL that Every points must satisfy all the rules and the ratio alignments in the image above. There is almost NO Exception for that. These ratios have been tested with thousands of pattern and proven to be very profitable trading them. Following the rule strictly will keep traders from bad setups and false harmonic patterns. Examples: